

Multi-store Location Connections
Learn how to connect inventory locations between your stores so Synkro knows exactly where to route each inventory change.
Last updated July 14, 2026
Overview
When you sync inventory between two or more stores, each store usually has its own set of inventory locations (warehouses, retail stores, pickup points, and so on). Before Synkro can mirror an inventory change from one store to another, it needs to know which location in the receiving store a change should land on.
The Multi-store location connections tool is where you define those relationships. You use it to say things like “When inventory changes at the St. Catharines location in Store A, update the St. Catharines location in Store B.”
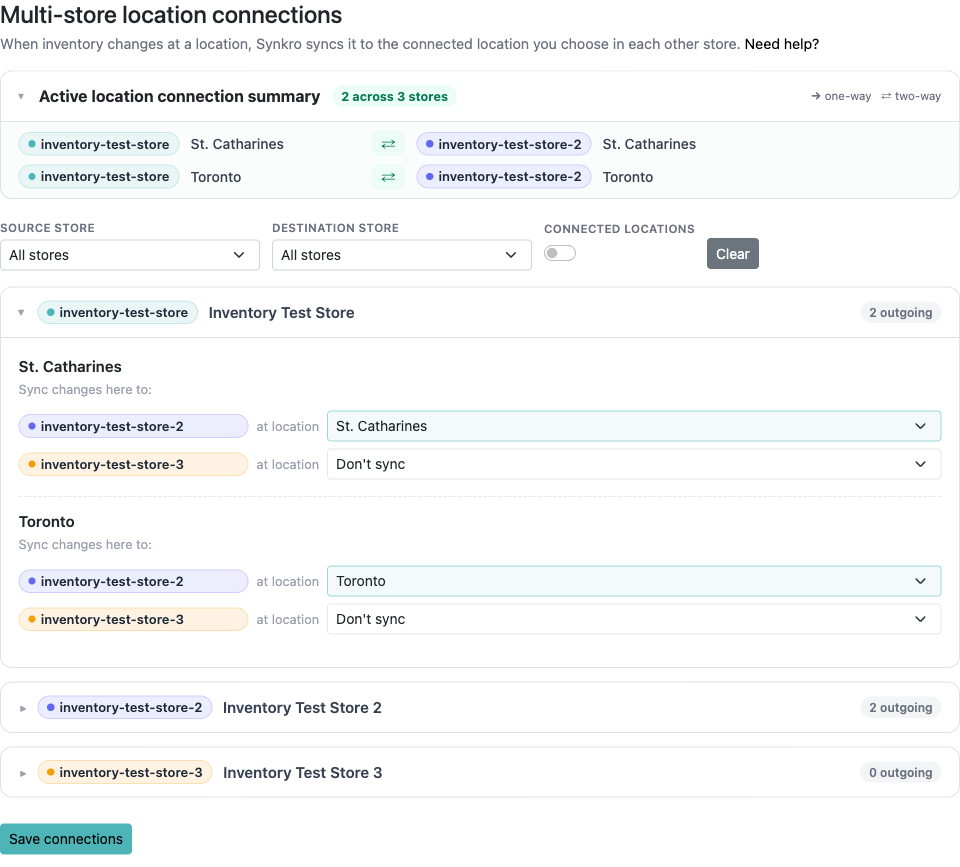 The Multi-store location connections screen: a summary of active connections at the top, filters in the middle, and the per-store editor below
This page focuses on the connections screen itself. If you are setting up cross-store syncing for the first time, start with Cross Store Inventory Syncing — that guide walks you through installing Synkro and connecting your stores, then sends you here to connect their locations.
How location connections work
Every connection is directional. It has two ends:
- A source location — the location where an inventory change happens.
- A destination location — the location in another store that Synkro updates to match.
Because connections are directional, you can set them up two ways:
- One-way (
→) — changes flow in a single direction. For example, changes at Store A’s warehouse update Store B, but changes in Store B are not pushed back to Store A. - Two-way (
⇄) — changes flow in both directions. This is simply two one-way connections pointing at each other, so the two locations always stay in sync.
By default, every location pairing is set to Don't sync. Nothing is connected until you choose a destination.
Step 1: Open the tool
You need at least two connected stores on your account before location connections are meaningful.
Click Settings in the top navigation of the Synkro app, then open Location connections → Multi store connections from the settings menu.
Step 2: Review your active connections
The Active location connection summary at the top gives you a condensed, read-only view of everything that is currently connected — no scrolling through every store required.
 Each row reads left to right: source store and location, the direction (
→ one-way or ⇄ two-way), then the destination store and location
A few things to notice:
- The badge next to the heading (for example,
2 across 3 stores) tells you how many connections exist and how many stores are involved. A two-way connection is counted once. - The legend in the top-right explains the
→(one-way) and⇄(two-way) icons. - Each store appears as a colored pill. Hover over any pill to see the store’s full
.myshopify.comURL and its store name.
 Hover a store pill to confirm exactly which store it refers to
If the summary gets long, only the first few connections are shown with a … more connections, click to expand link. You can also click the summary heading at any time to collapse the panel entirely.
 Click the heading to minimize the summary and keep your focus on the editor
Step 3: Filter to find what you need
When you have several stores and many locations, the filters help you narrow the view.
 Filter the editor by source store, destination store, or hide everything that isn’t connected yet
Source store— show only the store whose changes you want to route from.Destination store— show only connections pointing to a particular store. A store selected as the source can’t also be selected as the destination, and vice versa.Connected locations— turn this on to hide every pairing that is still set toDon't sync, leaving only the connections you’ve actually configured.Clear— reset all filters.
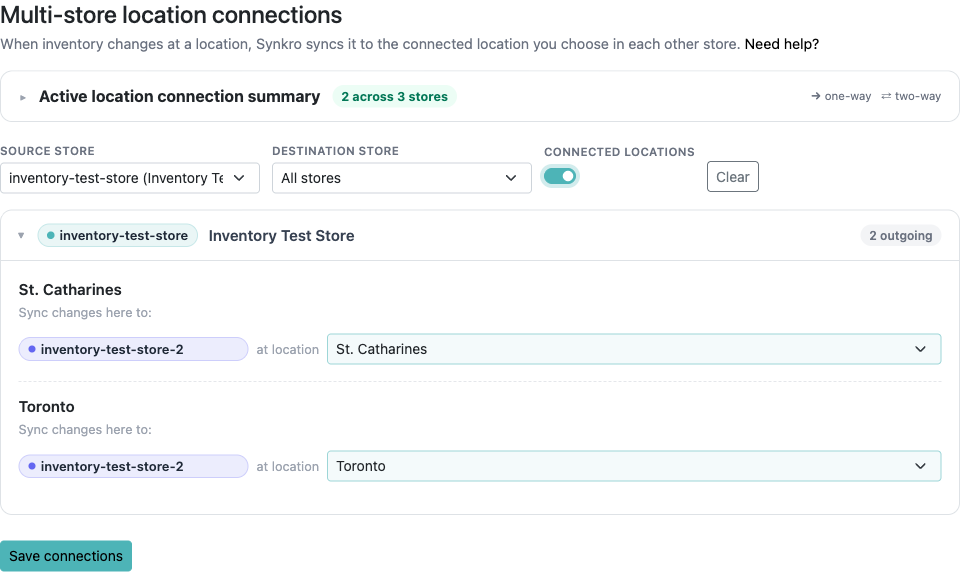 Filtering by source store with
 Connected locations enabled quickly isolates exactly what a store is syncing
The filters affect both the summary and the editor, and they never change your saved configuration — they only change what’s shown.
Step 4: Connect your locations
The editor lists each of your stores as a card. The card header shows the store’s pill, its name, and how many outgoing connections it currently has. Click a header to expand or collapse that store.
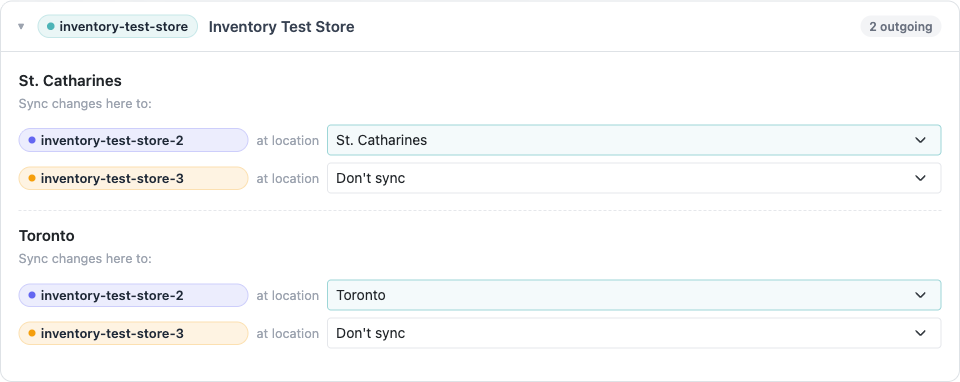 Inside a store card, each source location has a row for every other store where you choose the matching destination location
Inside a card, each of the store’s locations has a Sync changes here to: section. Every row represents one other store and reads as a sentence:
inventory-test-store-2at locationSt. Catharines
To make a connection, pick the matching destination location from the dropdown. To leave a pairing unconnected, keep it on Don't sync.
For example, to keep the St. Catharines locations of two stores in sync from Store A’s side, open Store A’s card, find its St. Catharines location, and set the row for Store B to Store B’s St. Catharines location.
Step 5: Make a connection two-way (optional)
Setting a destination in one store’s card only creates a connection in that one direction. To keep two locations fully in sync, add the reverse connection as well:
- Configure the connection in the source store’s card (Store A → Store B).
- Open the other store’s card (Store B), find the matching location, and point its row back at Store A.
Once both directions are set, the pair shows the ⇄ two-way icon in the summary.
Step 6: Save your changes
When you’re happy with your connections, click Save connections at the bottom of the editor. Synkro saves your entire configuration at once, and your connections take effect for inventory changes going forward.
Setup complete!
That’s it — Synkro now knows exactly where to route inventory changes between your stores’ locations. 🎉
Next steps
- Cross Store Inventory Syncing — the full walkthrough for connecting stores and enabling cross-store inventory sync.
- Local Pickup Location Syncing — connect locations within a single store using the
Same store connectionsscreen. - Master Inventory System — designate a source-of-truth store when you need one store to drive inventory for the rest.
Still have questions about your setup? Email us at support@synkro-app.com and we’ll be happy to help.